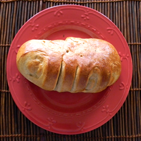
Food Storage Recipes – French Bread

The one thing we love in our house is bread. We use store bought bread for sandwiches, but all our dinner bread, whether rolls or loaves of bread, we make using our food storage. That means that we use our wheat and grind it into flour. There are two side notes before I get into this fabulous recipe. The first is that you need a good grinder for wheat. We do have a hand grinder, but we only use that if there is an emergency. We use the Vita-Mix for blending the wheat into flour. It is an amazing product and makes it just as fine as store bought flour. The second note is that don’t go all wheat flour. I can tell you from experience that your body may revolt some. We learned to still have some white flour and your body has an easier time adjusting.
My wife found a great site for recipes. The website is Jamie Cooks It Up. She modifies them to include our food storage. The only modification for this recipe is that she changed it from 5 cups of white all purpose flour to half wheat and half white flour.
Fabulous French Bread
Time: 90 minutes
Yield: 3 loaves
Recipe from Krista Robinson
1 T shortening
1 T salt
2 T sugar
1 C boiling water
1 C cold water
1/3 C lukewarm water
1 T yeast (I use active dry)
5 – 6 C white all purpose flour
1 egg
- Place the 1 C hot water in the microwave for 3 minutes to get it boiling.
- Dissolve the yeast into the warm water. Stir it around until it is all mixed.
- Combine the salt, shortening, and sugar in the bottom of your mixer with a fork. The dough hook doesn’t work very well. You need to smash up the mixture until it resembles the picture above.
- Pour the boiling water over the shortening mixture.
- Pour the cold water over the mixture.
- Pour the warm water and yeast into the mixer.
- Begin to add the flour, one cup at a time, until the dough pulls away from the side of your mixer…see the picture below.
- Let the dough mix on high for 8 minutes.
- Let the dough rise in the mixer for about 20 minutes. (This step can actually be skipped if you are in a hurry!)
- Separate the dough into three parts and place on a large jelly roll pan sprayed with cooking spray. Let the dough sit for about 5 minutes. Letting it sit will make it MUCH easier to shape.
- Spread the dough out (on the jelly roll pan) as pictured below.
- Then roll the dough up like this.
- Then bring the ends over and layer them on top of each other.
- Turn the loaf so the seam side is down. Repeat these steps with the other 2 parts of dough.
- Spray a sharp knife with cooking spray.
- Make your egg wash by whisking the egg until frothy.
- Cut three diagonal slits in the top of each loaf. Cover with the egg wash being sure to get it into all of the slits.
- Place the loaves in a warm 170 degree oven and let rise for about 15 minutes.
- Turn the oven up to 375 degrees for a convection oven, and 400 degrees for a regular oven. Leave the loaves in while the oven increases in temperature.
- Bake for 10 minutes convection or 15 regular oven, or until the loaves are golden brown and crusty.
- Turn the oven down to 325 for convection, 350 for regular and turn the pan around in the oven. Bake for another 7 minutes convection or 10 minutes for regular.
Enjoy making this delicious recipe. Enjoy eating even more.


